In this blog post we will tell you How to create a PhonePe account and How to Add bank account in PhonePe App.
What is Phonepe
Phonepe is a mobile app based on UPI id. This will help you to transfer money to anyone without sharing your information. Phonepe money transfer is easy and secure.
Here we are going to see how to setup Phonepe account. It is simple and easy to setup a Phonepe account on your device.
You can transfer money to UPI id or can directly transfer the amount to other’s bank account. The benefit of using Phonepe is easy and fast transfer.
Inorder to use Phonepe you need to create a Phonepe account. You can link your bank account with Phonepe account. Then you can transfer the amount directly from your bank account or your Phonepe wallet.
What is UPI?
UPI Stands for Unified Payment Identification Number. It is a secret code of 4-6 digit length that allows your money transfer.
UPI is a 24/7 service and you can use this service from anywhere anytime. For this you just need to entry your bank details and create a UPI id.
Benefits of using PhonePe
Some of the benefits of using Phonepe are,
Easy to pay to merchant:
While making purchases from a store or any other merchants you can make the payment very easy through Phonepe account. If merchant having a Phonepe merchant id, then you can directly transfer to their Phonepe account.
You can enter their Phonepe number or UPI id to transfer the amount directly.
If the merchant having scanning code you can pay even simple through Phonepe acoount.
You can scan their code from your Phonepe account, the interface provide scanner to fetch the merchant id for the payment.
So, Phonepe makes your shopping easy with the simple payment method.
Quick recharge and bill payments:
You can do the recharge for almost all the services through your PhonePe account. Also you can pay the bills of telephone, electricity, etc. through Phonepe.
You can do the recharge and bill payments from anywhere and anytime. This help you for hassle free payment for the services whenever needed.
Phonepe also allows auto renewal for some bill payments and recharge, this helps you to get uninterrupted from service providers.
Fast and secure money transfer:
Having a Phonepe account make easy banking process and easy money transfer. If you wish to pay for your friends or family from anywhere, you don’t have to go to a bank or any other banking service provider.
You can do this from few clicks on your Mobile device. This money transaction is fast and secure. All you needed for this is a good internet connection.
You can send money to just your contact list or if you don’t have their contact in your device, enter their number for payment, and you can find their id on Phonepe. Through you can make the payment.
How to create/setup PhonePe Account
Now, we can see step by step procedure to setup a Phonepe account:
For this you need to Download PhonePe app from Google Play store or App store.
Once you have downloaded Phonepe on your device you can do the setup. It is not complicated or confusing so that everyone can easily do the setup.
Here, we can see some simple steps to register or setup your Phonepe account.
Step 1: Open the Phonepe app that already downloaded in your device.
Step 2: The first thing you have to do is to verify your mobile number.
For this you have to enter the 10 digit mobile number and wait for the OTP verification.
Make sure that the mobile number should be the same registered with the bank account which you need to link with your PhonePe id.
You can wait for an OTP to verify your mobile number. Once you enter the mobile number, Phonepe will send an OTP to verify your mobile number. When you received the OTP, either Phonepe will automatically fetch the OTP, or you have to enter it for verification.
Step 2: Fill the required details like your name and Email address.
Step 3: Now, set your 4 digit password, this will activate the Phonepe wallet.
Step 4: Then click continue, this will take you to Phonepe user interface. The interface is very user friendly and Phonepe itself gives a small introduction about how to use it.
So, you have installed Phonepe app in your device and done the setup part.
How to add Bank Account in PhonePe
So, you have created a Phonepe account and now you need to link your bank account with your Phonepe account to make the transaction from bank account.
To connect your bank account with the Phonepe account you have to do some simple steps.
Step 1: Open the Phonepe home screen.
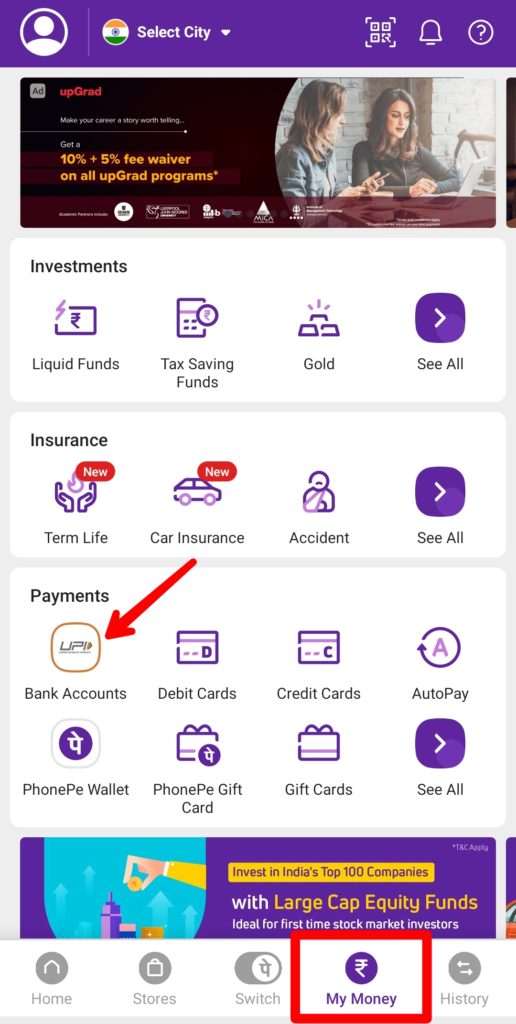
Step 2: Click on ‘My Money’ section at the bottom of home screen
Step 3: In ‘Payments’ choose ‘Bank Accounts’ to add your bank details.

Step 4: From the screen opened you can click ‘ADD NEW BANK ACCOUNT’ button at the bottom of your screen.
Step 5: From the next screen you can choose your bank from the suggestion. If not seen in the suggestion you can search your bank name on the top search box
Step 6: When you click the bank account Phonepe automatically send an sms from our mobile number it help you to fetch your bank details to connect with your Phonepe.
Step 7: Now select the account and click continue.
The bank account is now connected with your Phonpe account. Now you can transfer the amount to anyone from your bank account through Phonepe.
The bank account is now linked with your Phonepe, so you can add money to Phonepe wallet.
You can pay from your bank account, wallet or from UPI debit or credit card.
Overall, Phonepe is a very useful app for money transfer and sometimes you get exciting offers and cashbacks by using Phonepe services.
Currently, Phonepe not charging any service charges for money transaction either it is a person to person or merchant payment. So, the users would be benefitted from the zero transaction fee. Users can do money transaction from anywhere at any time. We can do a transaction of a very small amount through PhonePe. It allows Rs.1 Lakh for a single transaction, and it is the daily limit.
How To Delete PhonePe Account
To delete PhonePe account permanently you need to contact the customer care/support team because PhonePe doesn’t provide a direct option to deactivate your profile from the Android and iPhone app.
To delete PhonePe account then follow the steps below:
- ‘Open’ PhonePe App.
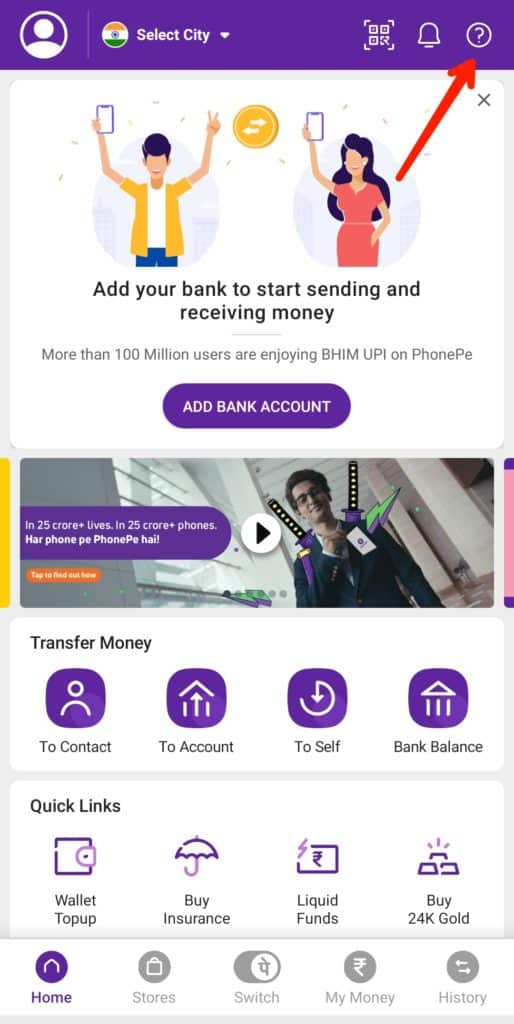
- Click on the ‘Question icon‘ at top of screen.

- Choose the ‘My Account, KYC & App issues’ option.
- Tap on ‘Account related issues’ and select ‘Deleting my account’.
- Choose a reason for Why you want to delete PhonePe account.
- After that click on ‘Contact Us’ button.
- On the next screen, Type a message that you want to delete PhonePe account permanently and click on the send message to raise a support ticket.
The customer care support team will contact you within 2-3 working days to confirm your request and your account will be deactivated.
